Front brake disk and pad replacement Jeep Wrangler (JL) 2018-

Preparation
Parts and consumables
- Brake disc
- Brake pads
- Anit-rattle shims
- Brake cleaning fluid (aerosol can)
Tips
- When pushing the caliper back to accommodate new brake pads, keep a close eye on the fluid level in the reservoir. Remove any surplus with a syringe.
- If guide pin bolts are to be re-used, apply thread locking compound before refitting.
- Never allow the disc brake caliper to hang from the brake hose. Damage to the brake hose will result. Provide a suitable support to hang the caliper securely.
- DO NOT add grease to guide pins, pin bushings, pad back plates or anchor bracket rails. Clean anchor bracket rails with brake cleaner prior assembly of new linings.
Tools required
- Jack
- Jack stands
- Wheel chocks
- Allen keys
- Torque wrench
- Lug wrench
- Sockets
- Ratchet
- Breaker bar
- Wrenches
- Screwdriver
- Piston retraction tool
- Shop rags
- Soft brush
1. Raise and support your vehicle
Video
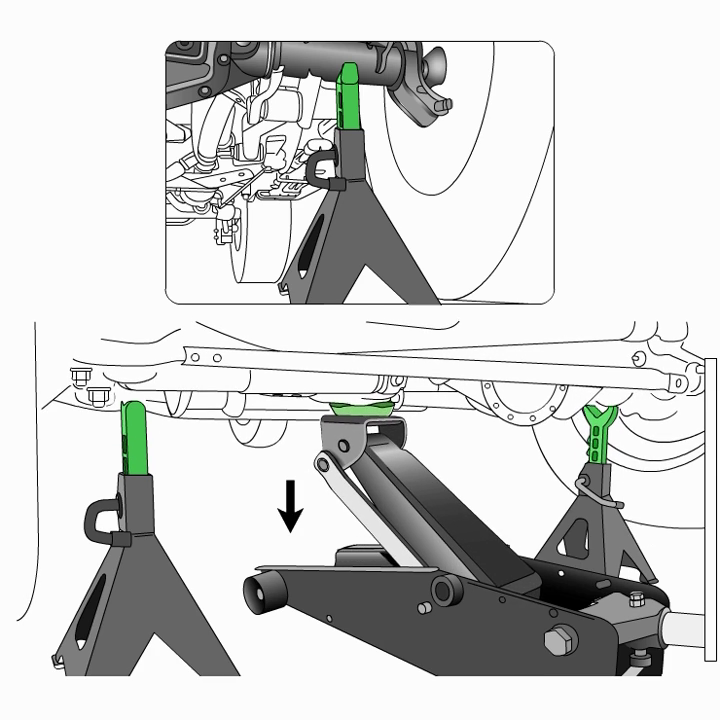
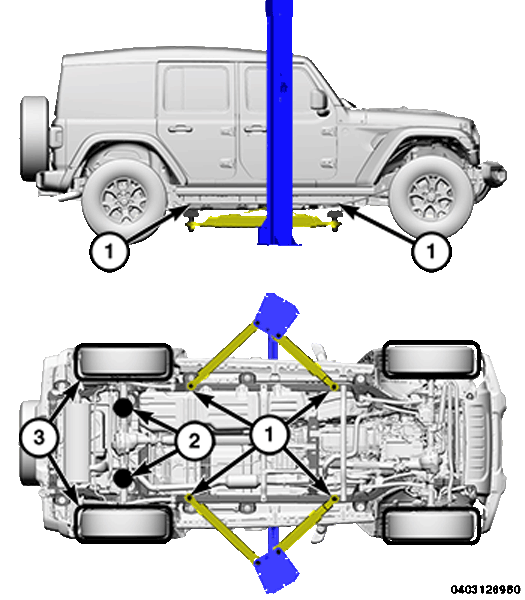
Lifting points
- 1. FRAME CONTACT LIFT (SINGLE POST)
- 1. CHASSIS LIFT (DUAL LIFT)
- 1. OUTBOARD LIFT (DUAL LIFT)
- 2. ALTERNATE LIFTING LOCATIONS
- 2. FLOOR JACK
- 3. DRIVE ON HOIST
How to Safely Lift a Jeep Wrangler Using a Floor Jack and Jack Stands
Safety First: Before you begin any work, ensure your safety and the safety of others:
- Work on a level surface.
- Ensure the vehicle is in "Park" or in gear (for manual transmission).
- Apply the parking brake.
- Wear safety glasses and gloves.
- Keep all body parts clear of moving parts and pinch points.
- Use proper lifting equipment and follow these instructions carefully.
Step-by-Step Instructions:
-
Gather Your Tools:
- Floor jack
- Jack stands
-
Locate the Proper Lifting Points:
- Refer to your vehicle's manual for the specific lifting points for your 2011-2018 Jeep Wrangler.
- Typically, the lifting points are located on the frame rails underneath the vehicle.
-
Position the Floor Jack:
- Carefully place the floor jack under one of the approved lifting points.
- Ensure the floor jack's saddle is centered on the lifting point.
- Pump the jack handle to raise the vehicle slightly but leave enough space to place the jack stand.
-
Place the Jack Stand:
- Position a jack stand near the floor jack, under another approved lifting point.
- Adjust the height of the jack stand so that it matches the height of the floor jack.
-
Lower the Vehicle onto the Jack Stand:
- Slowly and gently lower the vehicle onto the jack stand by releasing the floor jack's handle.
- Ensure the vehicle is stable and rests securely on the jack stand.
-
Repeat the Process:
- Move to the other side of the vehicle and repeat steps 3 to 5 to lift and secure the other side of the vehicle.
-
Verify Stability:
- Gently shake the vehicle to ensure it's securely supported by both jack stands.
- Ensure the vehicle is level and stable.
-
Proceed with Your Work:
- You can now safely perform maintenance or repairs on your Jeep Wrangler.
Important Notes:
- Never use a floor jack to lift a Jeep Wrangler by the body side sill, steering linkage component, drive shaft, engine or transmission oil pan, fuel tank, front suspension arm, or transfer case.
- Always use the correct sub-frame rail or frame rail lifting locations.
- When using a frame-contact type hoist, verify that the lifting pads are correctly positioned.
- If you're removing chassis or drivetrain components, take extra precautions to secure the vehicle to the hoisting device as the center of gravity may change, making the vehicle less stable.
Remember to work cautiously and always prioritize safety. If you're unsure about any aspect of lifting your Jeep Wrangler, consult a qualified mechanic or refer to your vehicle's manual for guidance.
2. Remove the front wheel and tire assembly
Video
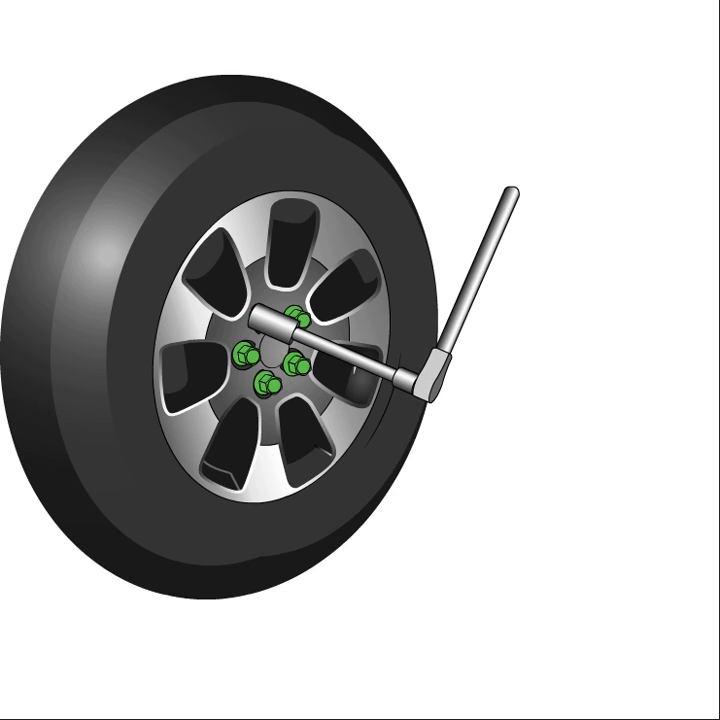
- Lug nuts
How to Remove the Wheel of a Jeep Wrangler:
Safety First:
- Ensure the vehicle is on a level surface.
- Apply the parking brake.
- Place wheel chocks behind the rear tires to prevent rolling.
- Wear safety glasses and gloves for protection.
Step-by-Step Instructions:
-
Gather Your Tools:
- Lug wrench or socket wrench
- Jack stands (if not already in use)
- Wheel chocks (if not already in place)
-
Locate the Lug Nuts:
- The lug nuts are the fasteners holding the wheel onto the hub. You'll find them around the perimeter of the wheel.
-
Loosen the Lug Nuts:
- Using your lug wrench or socket wrench, turn each lug nut counterclockwise (lefty loosey) to loosen them. Do not remove them completely at this stage, just break their initial resistance.
-
Lift the Vehicle Slightly (if needed):
- If the wheel is still in contact with the ground, carefully use the floor jack to raise that side of the vehicle just enough to allow the wheel to spin freely.
-
Fully Remove the Lug Nuts:
- Once the lug nuts are loosened, you can remove them by hand. Turn them counterclockwise until they come off. Place them in a safe spot, so you don't lose them.
-
Remove the Tire and Wheel Assembly:
- With the lug nuts removed, gently grasp the tire by its edges or use a tire iron to pry it off the wheel hub.
- Carefully pull the tire and wheel assembly away from the vehicle. If it's stuck, gently kick the bottom of the tire (not the rim) to loosen it.
3. Separate the brake caliper from the caliper adapter
Video

How to Remove the Brake Caliper from a Jeep Wrangler:
Safety First:
- Ensure your vehicle is on a level surface.
- Apply the parking brake.
- Wear safety glasses and gloves for protection.
- Make sure you have all the necessary tools before starting.
Step-by-Step Instructions:
- Prepare the vehicle:
- Raise your Jeep on a level surface.
- Remove the wheel as described above.
-
Isolate the Master Cylinder:
- Before starting work, we need to isolate the master cylinder to prevent brake fluid
from
draining out. To do this:
- Using a brake pedal holding tool (or a helper), depress the brake pedal fully and hold it down. This isolates the master cylinder from the brake system.
- Keep the pedal depressed until the brake lines are closed again.
- Before starting work, we need to isolate the master cylinder to prevent brake fluid
from
draining out. To do this:
-
Locate the Brake Caliper and Adapter:
- The brake caliper is the part that clamps onto the brake rotor and houses the brake pads. The caliper adapter is the bracket that holds the caliper.
-
Remove the Caliper and Adapter as an Assembly:
- Find and remove the bolts that connect the caliper adapter and the caliper to the vehicle. These are usually located at the rear of the assembly.
- Once the bolts are removed, gently slide the caliper and adapter assembly away from the rotor.
Remember, if you're unsure about any step, consult your vehicle's manual or seek assistance from a qualified mechanic. Safety and proper technique are crucial.
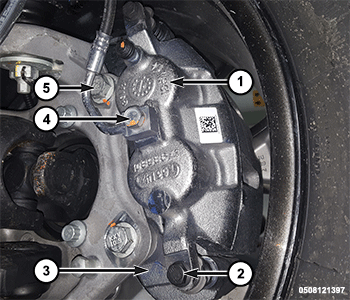
- Brake Caliper
- Caliper Bolts
- Caliper Adapter
- Brake Hose Banjo Bolt
- Caliper Adapter Bolt
4. Remove the brake caliper
Video

-
Separate the Caliper from the Adapter:
- After removing the assembly, carefully separate the brake caliper from the caliper adapter. Be gentle to avoid damaging the brake line.
-
Remove the Brake Hose Banjo Bolt:
- Locate the brake hose banjo bolt where the brake line connects to the caliper.
- Using an appropriate wrench, turn the banjo bolt counterclockwise to remove it.
- Discard the two copper gaskets that were on each side of the banjo bolt.
- Brake Caliper
- Caliper Bolts
- Caliper Adapter
- Brake Hose Banjo Bolt
- Caliper Adapter Bolt
-
Remove the Caliper Bolts:
- Locate and remove the two caliper bolts that were connecting the caliper to the adapter.
-
For Light Duty Sport Models Only (if applicable):
- Before removing the caliper, use a suitable clamp tool to gently push the outboard brake pad away from the brake caliper. This breaks the adhesive bond between the pad and the caliper.
-
Carefully Remove the Caliper:
- Once the caliper bolts are removed, carefully slide the caliper away from the adapter. Be cautious not to damage the brake hose.
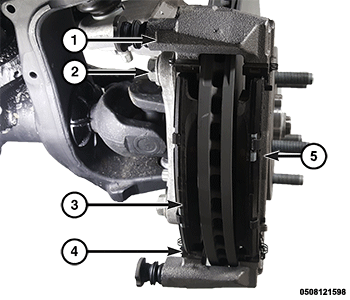
- Caliper Adapter
- Caliper Adapter Bolts
- Inboard Brake Pad
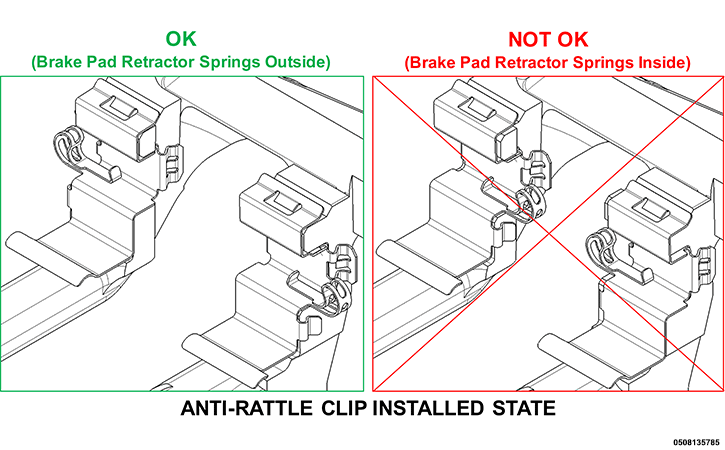
- Anti-Rattle Clips
- Outboard Brake Pad
-
Remove the Pads:
- Remove the brake pads and anti-rattle clips from the caliper. - In some cases, you may need to retract the caliper pistons slightly to create enough space to easily remove the caliper from the adapter. Avoid pushing directly on the pistons to prevent damage.
-
Support the Caliper:
- Ensure that the caliper is securely supported and not hanging from the brake hose. Using a suitable support, hang the caliper securely.
5. Remove the brake rotor
Video

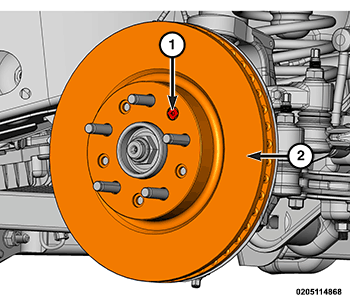
- Front Rotor Screw
- Brake Rotor
- Remove the front rotor screw
- Remove brake rotor
6. Installation
Video

During installation, torque the fasteners to the specifications in the torque table(s) below.
| DESCRIPTION | SPECIFICATION |
| Brake Rotor Splash Shield Bolts | 11 N⋅m (8 Ft. Lbs.) |
| Front Caliper Adapter Bolts | 200 N⋅m (148 Ft. Lbs.) |
| Front Caliper Bolts | 37 N⋅m (27 Ft. Lbs.) |
| Front Caliper Bleed Screw | 10 N⋅m (7 Ft. Lbs.) |
| Front Caliper Brake Hose Banjo Bolt | 35 N⋅m (26 Ft. Lbs.) |
| Front Rotor Screw | 20 N⋅m (15 Ft. Lbs.) |
Step-by-Step Instructions:
-
Install the New Brake Rotor:
- Place the new brake rotor onto the wheel hub.
- Ensure the rotor is properly aligned with the wheel hub.
- If necessary, use a lug nut to hold the rotor in place temporarily.
-
Prepare the Caliper for Installation:
- If you have not already done so, press both caliper pistons into their caliper bores using a suitable tool. This ensures they are properly seated.
-
Verify the Caliper Adapter Surfaces:
- Ensure the mounting surfaces of the caliper adapter are clean, free from rust, and debris. Clean them if needed.
-
Install New Anti-Rattle Clips:
- Install the four NEW anti-rattle clips onto the caliper adapter. Ensure they are properly seated.
-
Fit the Brake Pads:
- Attach the new brake pads to the caliper adapter. Ensure they fit snugly and align correctly with the rotor.
-
Mount the Caliper Assembly:
- Carefully position the caliper assembly over the brake pads.
- Ensure the caliper slides smoothly onto the caliper adapter.
-
Secure the Caliper with Bolts:
- Reinsert and tighten the two caliper bolts that secure the caliper to the caliper adapter. Tighten them securely but avoid over-tightening.
-
Install the Brake Hose Banjo Bolt:
- Before tightening the banjo bolt, ensure the brake hose is not twisted or kinked.
- Install two NEW copper washers onto the banjo bolt.
- Carefully thread the brake hose banjo bolt into the caliper. Tighten it securely.
-
Bleed the Brakes:
- Before driving, bleed the brake system to remove any air bubbles. This is crucial for brake performance.
- Follow your vehicle's specific bleeding procedure or consult a mechanic.
-
Seat the Brake Pads:
- With the vehicle stationary, gently pump the brake pedal until the caliper pistons and brake pads are seated against the rotor.
- Continue pumping until you achieve a firm brake pedal.
-
Verify Brake Fluid Level:
- Check the brake fluid reservoir to ensure it's at the proper level.
- Add brake fluid if necessary to maintain the correct level.
-
Test the Brakes:
- Before driving, test the brakes at low speeds to ensure they are operating correctly.
- Remember that braking effectiveness might be slightly reduced during the first brake applications following installation.
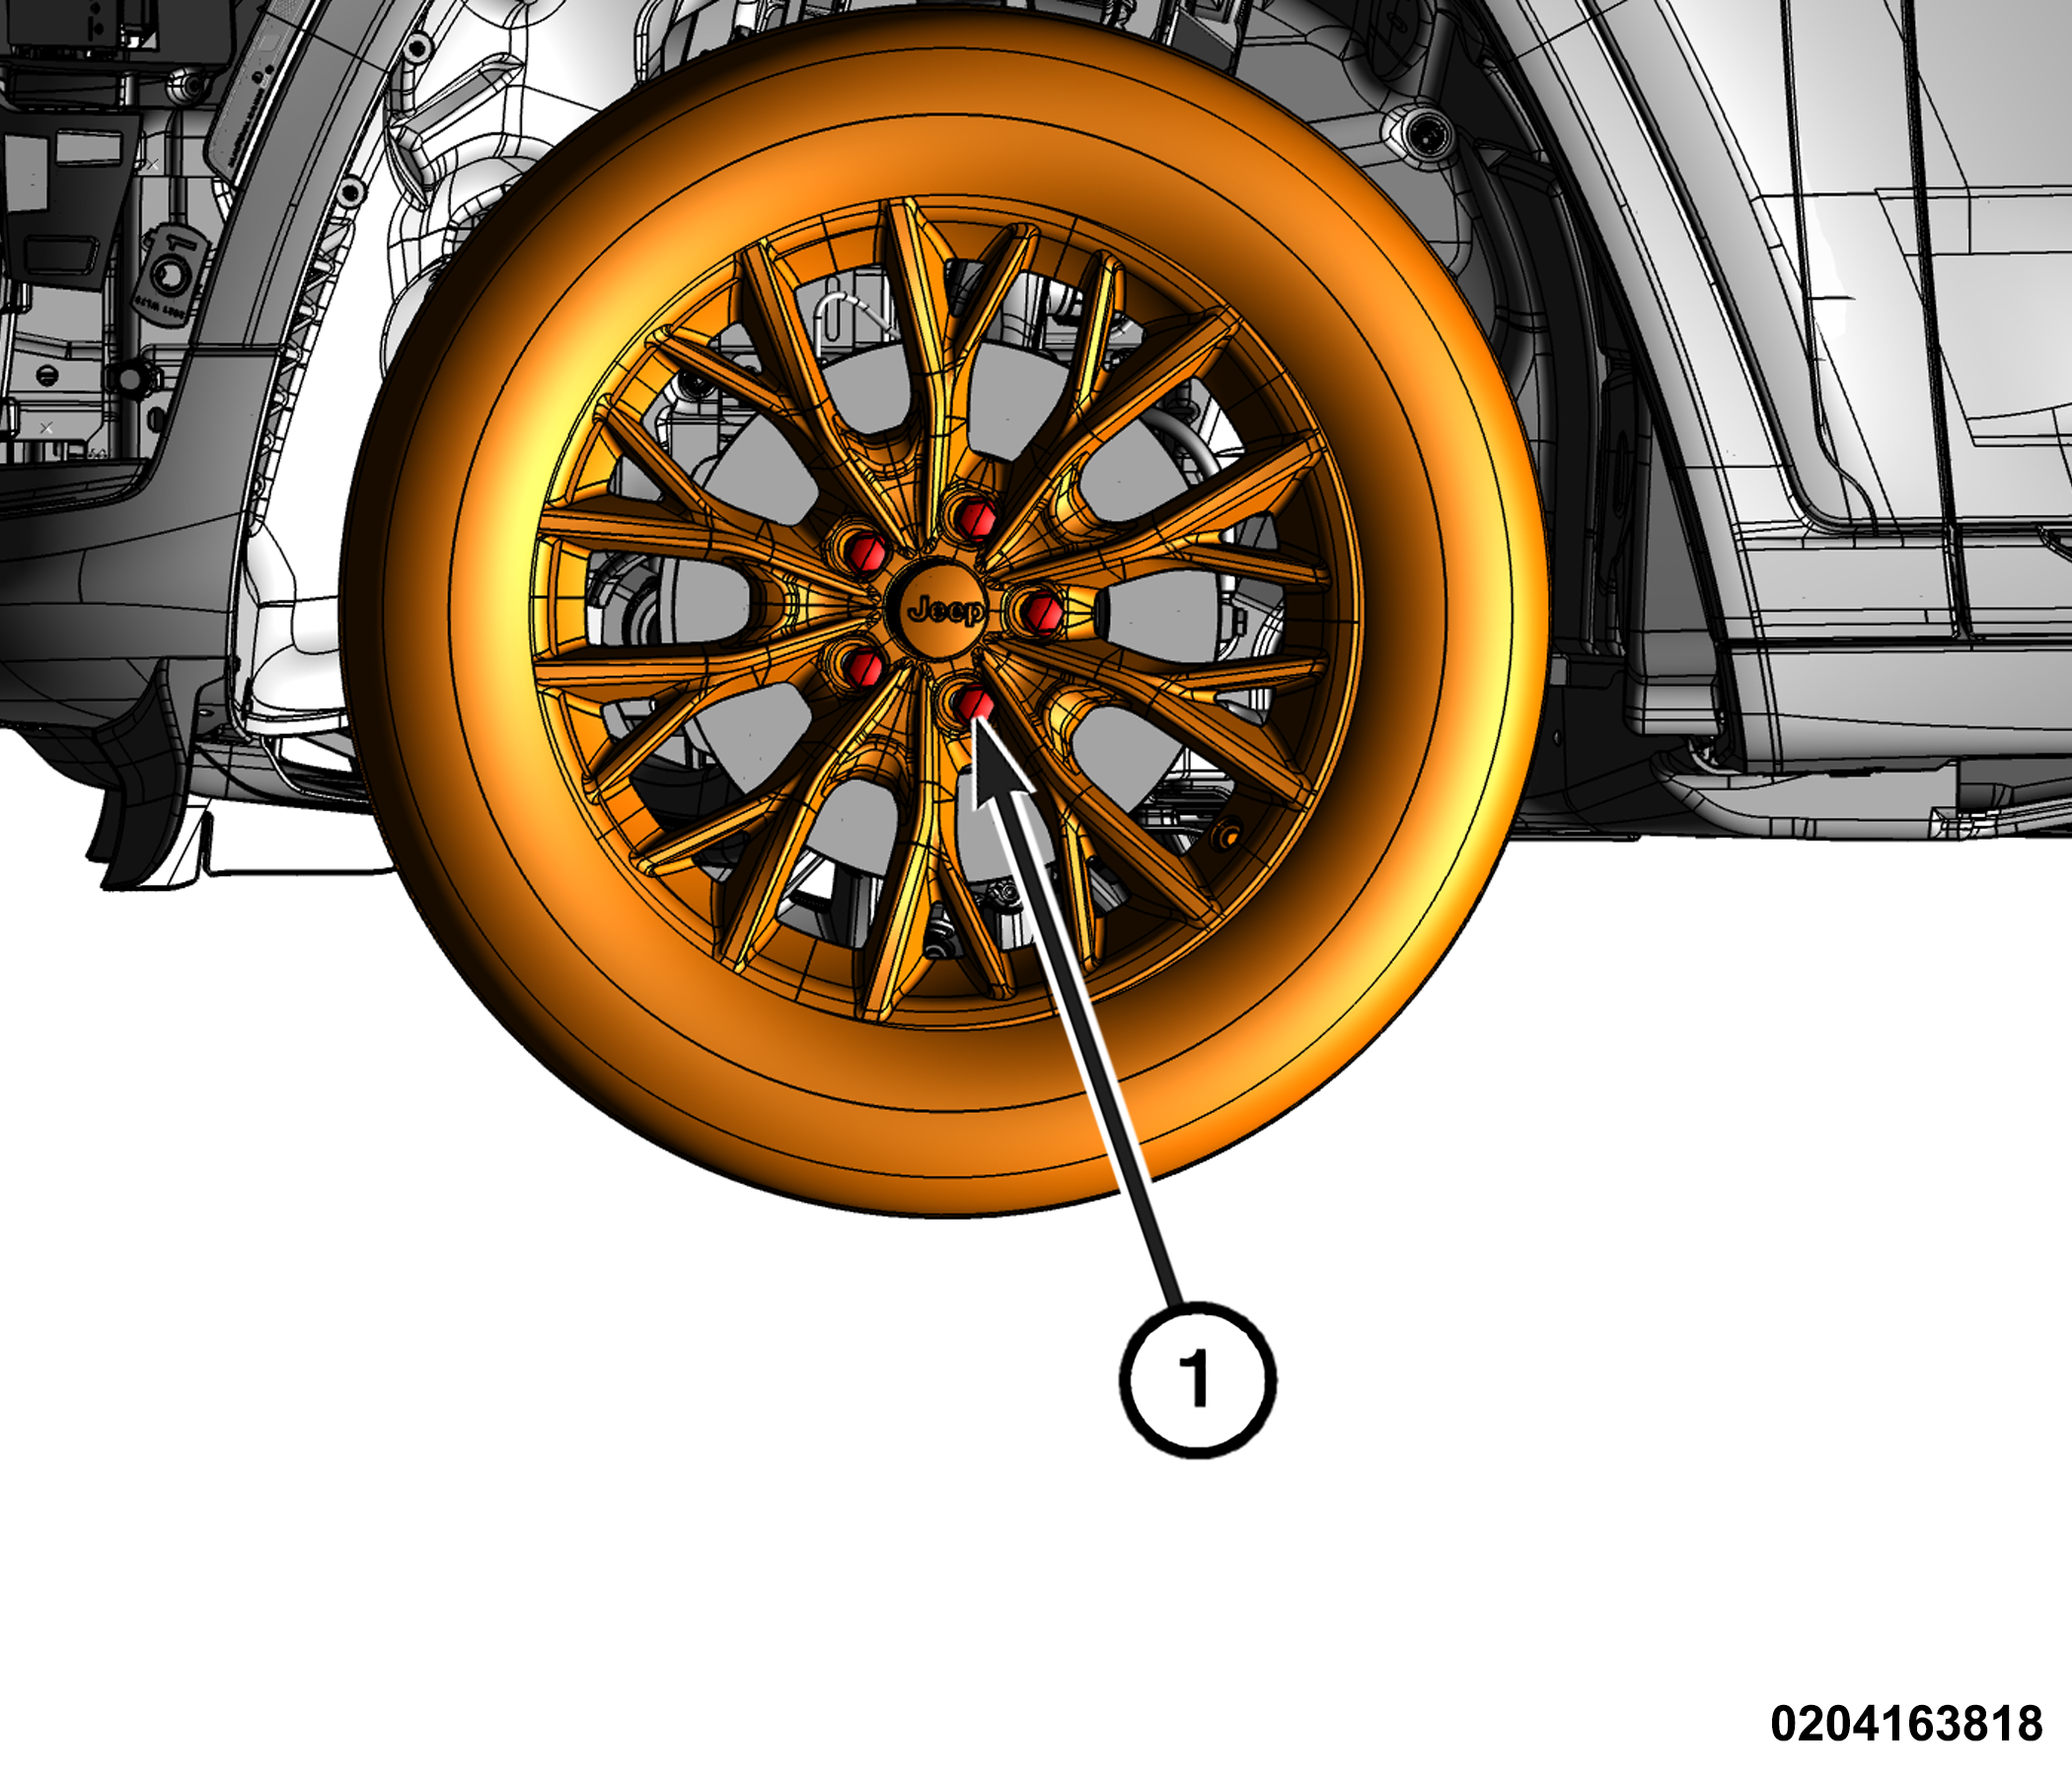
Reinstall or Replace the Wheel
To reinstall, align the wheel's bolt holes with the wheel studs on the hub.
- Gently push the wheel onto the hub, ensuring it's flush.
- Hand-tighten the lug nuts in a star pattern to ensure even pressure.
Tighten the Lug Nuts:
- Using your lug wrench or socket wrench, snugly tighten the lug nuts in a star pattern (opposite lug nuts) in a clockwise direction (righty tighty).
- Do not fully tighten one lug nut before the others; gradually tighten them to ensure even pressure. This prevents the wheel from going on unevenly.
Lower the Vehicle:
- If you used a floor jack to raise the vehicle, carefully lower it to the ground.
- Once the vehicle is on the ground, use your lug wrench to fully tighten the lug nuts in the same star pattern as before. Tighten them securely, but avoid over-tightening.
Double-Check Lug Nut Tightness:
- After driving a short distance (about a mile or so), recheck the lug nuts' tightness. They can sometimes settle after initial tightening.
Remember, if you're unsure about any step or encounter difficulties, consult your vehicle's manual or seek assistance from a qualified mechanic. Safety and proper technique are paramount.
| DESCRIPTION | SPECIFICATION | LUG NUT SIZE | LUG NUT SOCKET SIZE | |
| 1 | Lug Nut | 176 N·m (130 Ft-Lbs) | M14 x 1.50 | 22 mm |
Use only authorized dealer recommended lug nuts and clean or remove any dirt or oil before tightening.
7. Bleeding
Caution: Do not use this procedure if the master cylinder, Hydraulic Control Unit (HCU), brake booster, or the lines between the master cylinder and the HCU have been replaced. If any of these components are replaced using pressure bleeding equipment and suitable diagnostic equipment.
Note: During the bleeding procedure, add only clean, unused hydraulic fluid of the recommended type; never re-use fluid that has already been bled from the system. Ensure that sufficient fluid is available before starting work.
- Clean the area around the brake master cylinder cap, the unscrew the filler cap, and place shop rags around the area to absorb any spilled fluid.
- Attach one end of the bleed hose to the bleed screw and insert the opposite end in a suitable container partially filled with brake fluid. Be sure the end of the bleed hose is immersed in fluid (see illustration).
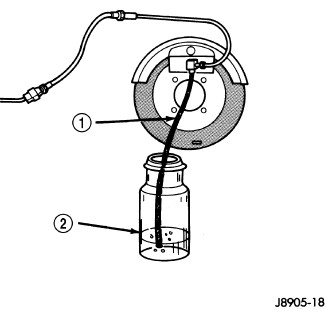
- Fill the master cylinder reservoir with brake fluid.
- Bleed only one brake component at a time starting with the caliper furthest from the master cylinder.
- Open up the bleeder screw, then have a helper press down the brake pedal. Once the pedal is down close the bleeder screw. Repeat bleeding until the fluid stream is clear and free of bubbles. Then move to the next wheel.
- Upon completion, top up the fluid level in the reservoir and securely install the cap. Check for correct operation of the brakes before moving the vehicle.